AirPlay speakers via cellular

Most Airplay speakers have a mode they can act like a wifi base station so you can play your music to them when you're not on wifi. However, as soon as you connect to the speakers wifi, your phone won't stream from Spotify or google music or even Apple Music any more.  You're stuck with whatever you've downloaded. Unless... you know this "one weird trick."

Normally, as soon as your phone connects to a wifi network, it won't even try to use cellular, even if you're connected to a speaker with no internet connection. 

There is a way to indicate to your phone that the wifi connection you are on has no internet connection and it should use cellular to talk to the internet. 

After you've connected to your speaker's wifi, go back into settings. Choose wifi, then tap the info ℹ️ button beside your speaker's wifi network. Tap into the Router section and delete whatever is there. 

That's it! Without that setting, your phone doesn't know where to direct traffic that isn't on your local network (i.e. the speaker's) and will use cellular instead. 

You can still choose your speaker as an airplay output, but streaming services like Spotify, google music, Apple Music, or even YouTube will work over your cellular data connection!  Your phone should remember the change, as long as your airplay speaker doesn't change network names. 

Public Mobile

Last year in November, Public Mobile had a deal where you got 4GB/month for $38/month (plus unlimited texting and province wide calling).  I switched in a heartbeat from my 6GB Rogers grandfathered plan, and have been perfectly happy with it for about half the price.  You were only able to get the deal for a while, but it looks like they're offering it again to Freedom Mobile customers.  

I think it's about the same price-wise as Freedom Mobile, but Public Mobile is on Telus' network, which is light years better than Freedom Mobile's.

Here are the issues with Public Mobile... if any of these bother you, the deal isn't for you.  Otherwise though, if you're eligible, go for it, it's been amazing for me!

  • Public mobile has basically no walk-in or phone customer service.  You can deal with them through an online forum, and that's about it.  If you call your current carrier for any reason, don't switch.  I never did, and haven't needed to, so this didn't matter to me, but if you're the type to call the billing or support department, this isn't for you!
  • You need your own unlocked phone.  I stopped buying locked phones a while ago, so this didn't affect me, but maybe it does for you.  CRTC is banning carriers from locking phones or charging for unlocking them, but that doesn't take effect until winter, too late for this.

If I haven't scared you off, click here to check out their offer, good until June 30.  If you want to sign up and don't know someone else to give the referral bonus to, email me at electrollama@gmail.com and I'll gladly give you my referral info! ; )

HTML SSE with Node.js and Nginx: AlphaParty

HTML SSE (server sent events) are a somewhat obscure way to handle server to client communications that's often overlooked in favour of web sockets.  For a lot of things, web sockets are complete overkill, and you can get away with a simple SSE implementation.

For a future app I have planned, I need to support a variety of clients, web, Mac, PC, iOS.  They need to communicate in realtime with a server.  However, the communication requirements are pretty simple, and I don't want to spend all my time debugging it.  Websockets seems like overkill, so I looked for something easier.  I read about HTML SSE (Server Sent Events), and it sounded promising. I did some experimenting with SSE, and wound up making an AppleTV party game as a proof of concept that syncs multiple web clients in realtime. 

The exact details of using SSE isn't what I'm trying to describe here, for that, you can check out this article. It's pretty easy to follow and has instructions for both php and node (although, as I'll explain later, node is probably a better choice if you want your application to scale well).  The code for SSE is pretty easy, what I had trouble with was the server configuration, that's what I'm trying to address here.

If you're not a programmer, or not suffering from insomnia, you can probably stop reading here.  Just go to the AppleTV App Store and download AlphaParty and enjoy!  It's an easy to play party game up to 36 people can play simultaneously via phone using just the browser. I put it on sale for $2 USD (regularly $5) for the rest of June 2017.

SSE is basically an HTTP connection to the server that doesn't close.  When the server needs to alert the client(s) about something, it sends some additional data.  The data is essentially just a line of text that can contain whatever you want (probably JSON if you're sending anything interesting, but can be anything, really).

Any supported client (including all modern-ish web browsers) support receiving these, and will generate a Javascript event.  You can read about how to do it, and understand it fully pretty quick.  There are lightweight implementations in swift and other languages that generate native events or call blocks or whatever, so it's simple to implement in any platform.

You probably don't want to implement this in a PHP/Apache environment if you're planning to support many users.  The way Apache creates another thread for each connection becomes problematic because SSE can leave the connection open indefinitely.

I built the backend in Node.js, which is more suited to this sort of thing due to its non-blocking architecture.  It works great...  however, as you know if you're familiar with Node.js, you don't generally put your Node.js apps right on the internet.  If you want HTTPS and to handle many different applications on the same server, you'll want to proxy it behind a web server, either Apache or Nginx.  As mentioned before Apache's architecture makes it unsuitable for SSE because having many connections that are open for a (potentially) long time will cause it to have many threads to manage.  This leaves Nginx as the obvious choice.

However, there are some issues.  Out of the box, Nginx does not play nice with SSE.  There's 2 fundamental issues to contend with.

Aggregating

By default, Nginx won't send data immediately.  It waits a bit to see if there's more coming, so it can bundle it into a single packet.  This is definitely not ideal for SSE, where you send small bits of data, but expect them to be delivered immediately.

Connection Closing

This doesn't seem to be a problem if you're not using HTTPS, but if you are, Nginx likes to close connections that are idle for more than a few seconds.  Since SSE's modus operandi is to leave connections open and stream data when there's an event, Nginx winds up closing your SSE connection at inopportune times.  SSE has a reconnect setting, but there's a delay, and when trying to do anything approaching real-time, this becomes a problem.

Both of these are easily overcome by changing Nginx's configuration.. add the following lines to your "sites-available", in the location section for the Node.js server that uses SSE

#This deals with the Aggregating issue
    chunked_transfer_encoding off;
    proxy_buffering off;
    proxy_cache off;

#This deals with the connection closing issue
    proxy_set_header Connection keep-alive;
    proxy_connect_timeout 3600;
    proxy_send_timeout 3600;
    proxy_read_timeout 3600;
    keepalive_timeout 3600;

Thanks for reading... if you'd like to try my proof-of-concept AppleTV game that's implemented using HTML SSE, you can read more and get it from here, on sale for the rest of June 2017.  Send me a note at electrollama@gmail.com if you have any questions.


Tags ,

My Dirty Little Secret - iCloud Drive

Ok, this is probably a lot less scandalous than a lot of dirty little secrets, but in the Apple tech world, it seems like quite an admission.

I'm using iCloud Drive and I like it.

For serious work even, I have all my Xcode projects in iCloud Drive folders and they sync between my two Macs.  I have yet to experience any issues, although a couple times I thought I had close calls.

For years I had been looking for a good way to have all my photos (stored in iPhoto at the time) available from anywhere all the time.  Ages ago I used a package called iPhotoWebGallery (or something to that effect) that ran a web server and made your photos available. It worked ok, but I was on cable, with a lousy upload speed, and it never really made the transition to the mobile-first world.

Anyway, long story short, when Photos.app replaced iPhoto and offered to sync all your photos, I was instantly sold.  It did what I wanted, but my library had grown so much, I needed the 500GB plan to hold my 300+GB of photos and videos. (side note, the storage has gone from 500GB to 1TB, and now to 2TB without a price increase... I like where this is going.  If I had the option to downgrade to 1TB, I would though, 2TB is overkill)

I've used dropbox in the past, but never enough to pay for it.  I've setup my own file servers and tunnelled connections through SSH and used SSHFS, but nothing ever really worked well for me.  I tried Google drive, but at the time, the clients were flakey and it didn't work that well.

Despite Apple's terrible reputation with cloud services, I figured I'd give iCloud Drive a shot.  I had over 100GB storage that I was already paying for, and an old MacBook Air that I wanted to be able to do mobile development on.  

Throwing caution to the wind, I copied my development folder on my iMac to iCloud Drive, waited for it to sync to my MacBook Air.  When I first opened my project on the MacBook Air, it just worked...  I made a couple tentative changes, and sure enough, they made it back to my iMac. so far, so good.

This story doesn't really have a dramatic ending or anything... I've been working this way ever since, and things just seem to work.

My MacBook Air only has a 128GB drive that is perpetually full.  iCloud Drive will delete the Air's copy of my lesser used development folder or certain files when I haven't opened them there for a while.

This did lead to what I thought was a data corruption issue, but turned out to be not much.  I have one project (eyeCam, check it out, it's the best webcam viewer ever, and it's free!) that relies on some large library files.  Unbeknownst to me, iCloud Drive had deleted some of these files to free up space on my MacBook Air.  When I tried opening the project in Xcode it appeared to hang.  I gave it a minute or two, forced quit it, and tried again... same thing.  Convinced I'd somehow corrupted my project, I started opening up my backups, praying to the data recovery gods that I wouldn't lose too much work.

I recovered my backup, and went back to work, a little leery of iCloud Drive.  A month or so later, the same thing happened.  As luck would have it, this time, I noticed the little progress indicator in Finder beside iCloud Drive.  I clicked on it, and it said it was downloading close to 1GB of files!  I guessed this was the reason for my hung Xcode window and waited.  Sure enough, as soon as the iCloud Drive progress indicator reached the end, Xcode finished loading normally.  It had been waiting on these files to download.

That's my only real complaint now, but I'm not really sure how it could be addressed.  Perhaps a notification that this is happening would have been helpful.  It really looked like Xcode had just beach balled, without any indication of what was happening if you didn't know where to look.

There could also be a problem if you didn't realize your files had been removed to save space and you hopped on a plane or something and expected to do work.  Again, I'm not really sure what the solution would be, but some kind of warning or notification might be a good start.

Anyway, the moral of this story is... if you're already paying for iCloud storage for your photos, give iCloud Drive a try, you might be pleasantly surprised!

Tags , ,

Login Items in macOS 10.11 and newer

If you've ever written or tried to write a macOS application that needs to launch itself at login, you've probably spent some time fighting with SMLoginItemSetEnabled.

There are a couple of good tutorials online that explain how to setup a help application and embed it in your main application to launch it.

However, after doing everything right, you may be banging your head against the wall because your application won't launch when you login.

That's what happened to me, anyway.

In my case (and maybe yours), the problem turned out to be copies of my app scattered around my hard drive that were confusing LaunchServices.  Once I removed all but one copy, it worked as expected.

The tricky part is, Xcode puts copies of your app in all sorts of temporary folders, and maybe you've dragged them to the trash.  LaunchServices can get confused by any one of these.

After some mucking around, I found a way to locate all the copies that LaunchServices knows about, and to reset its database once you've cleaned them out.

You use a utility called lsregister, it's probably not in your path, so you'll need the full path to run it.

Find all copies of your app that LaunchServices knows about:

/System/Library/Frameworks/CoreServices.framework/Frameworks/LaunchServices.framework/Support/lsregister -dump|grep .*path.*<YourAppName.

After deleting the extra copies, reset the LaunchServices database:

/System/Library/Frameworks/CoreServices.framework/Frameworks/LaunchServices.framework/Support/lsregister -kill -r -domain local -domain system -domain user

Also, now that Apple has deprecated several LaunchServices APIs, it's not easy to determine if your app is currently set to start on launch.  It seems most apps just don't check anymore, which is probably fine, but I suspect you could call lsregister -dump and parse the output to find out if your app is set to launch or not.

Simpson Creek in the summer

Here's a photo of the Canadian Rockies that isn't Banff, Lake Louise, Morraine Lake or Jasper.

FullSizeRender.jpg

Just off highway 93 in the Canadian Rockies. A forest fire a few years back burned most of the trees on this valley. 

Playing from iOS device to multiple speakers

I wrote an article a few days ago on using AirFoil to do multi room audio like sonos does using hardware you might already have. It was pretty well received, read it here if you missed it.  

However I didn't really explain the trick to playing to multiple speakers from an iOS device. This is totally possible, just requires one extra step. 

You need to install one other application on your Mac (or PC, if that's how you roll). This one's called AirFoil Satellite/Speakers. It's a companion app for AirFoil by the same people. It turns your Mac into an AirPlay speaker. 

This is AirFoil Speakers... they've since rebranded it as AirFoil Satellite, but I paid for the old version, so mine's still called Speakers

This is AirFoil Speakers... they've since rebranded it as AirFoil Satellite, but I paid for the old version, so mine's still called Speakers


Install it, and run it.  You'll see AirFoil Satellite show up in in your list of AirPlay speakers, in both your iOS devices and in AirFoil.  You don't want to tell AirFoil to play TO this speaker, you want to choose AirFoil Satellite as the SOURCE.  Once you've done that, select AirFoil Satellite in the AirPlay section of the iOS device you want to play to.  You should hear the music come out of all the speakers you have AirFoil set to play to.  I rename my AirFoil Satellite/Speaker to be called "~Whole House~".  This reminds me NOT to play to from AirFoil and the tilde (~) in the front keeps it at the top of my AirPlay speaker list in my iOS device. 

Click the top of the AirFoil window to select the audio source. &nbsp;You want to choose AirFoil Satellite (Speakers in my case). &nbsp;You may have to click "Other Application" and locate it in Finder if it's not in the list.

Click the top of the AirFoil window to select the audio source.  You want to choose AirFoil Satellite (Speakers in my case).  You may have to click "Other Application" and locate it in Finder if it's not in the list.


A note about doing this, your iOS device (particularly iPhones, more so than iPads), need to be in good wifi when playing using AirPlay.  You'll get much better results setting it on a table or something than if it's in your pocket.


Remotely connecting to your Mac

There are a multitude of ways to connect to your Mac remotely, be it across the room, or across the world. 

However, they’re not all crated equally.

I’ve tested many of them, and one seems clearly better in terms of performance.  Some of the ones I've tried are Log Me In, Google's screen sharing service, UltraVNC, and a few others I've since forgotten.

The best method (strictly in terms of performance) is the built in screen sharing. No extra software to install and configure.  You can connect from any other Mac without any additional software and, as I'll describe below, you can also connect from Windows PCs and iOS devices.  I'm honestly not sure why other services are so popular, since it seems that the best performing one is free and built into the OS. I guess it's just not well known and maybe a little tricky to setup. 

It’s not enabled by default, you need to make a quick change in the sharing section of your system preferences.  

Turn on Screen Sharing in your Mac's System Preferences

Turn on Screen Sharing in your Mac's System Preferences


Connecting from another Mac. This is the simplest.  Other mac on your network will appear in the finder sidebar, and you are two clicks and a password away from controlling it.

If you want to do this from outside your network, you need to setup port forwarding on your router. The port in question is tcp port 5900.  If you don’t feel good about opening this to the internet, good for you. You still have options, you could use ssh tunneling or a VPN.  VPN is probably the easiest, and is supported by some routers out of the box. If you're only planning to connect from other Macs, you can enable Back to my Mac in iCloud and in theory, this Mac will then show up in the side bar of any Mac you're using when signed into your iCloud account.  I've had mixed success with this, but using the method below works 100% of the time, and from non-Mac computers.

To connect to a remote Mac that doesn’t just show up in the side bar, you can use the menu option Go / Connect to Server... in the Finder. The address you enter should be in the format vnc://external IP address. If your port forwarding put you on a different port than 5900, specify the new one with the :12345 syntax. You'll probably want to setup a DDNS service to make your computer accessible from anywhere.  That's beyond the scope of this article, but check out your router's configuration and look for DDNS to see which service(s) it supports.  There are lots out there.

You’ll notice that the screen display is quite good, and updates pretty quickly. If you've used VNC on other platforms this might come as a surprise.  It's usually fast or nice looking,but not both. Apple has added some proprietary extensions that adapt to speed, and progressively send more detail do that the screen updates quickly, and static screens look perfect. 

There is a downside though. These extensions are not well supported by third party VNC clients. No big deal if you exclusively connect from other Macs, but from a PC or iOS device, you need a third party client, as Apple doesn't provide one. Most VNC clients work with a Mac, but only at full fidelity, resulting in a sluggish display over all but the fastest networks.   

I've found one welcome exception to this though.


Connecting from a PC or iOS Device. The Remotix client, available for iOS and Windows actually supports Apple's proprietary extensions and works just as well as connecting from a Mac.  

You can find out about the iOS version here: https://www.nulana.com/remotix-ios/

You can find out about the Windows version here: https://www.nulana.com/remotix-windows/

They also make a Mac version, although, I don't know why you'd want it for this purpose, as you can already connect natively from a Mac.

As far as I know, there are no Linux or Android clients that work nicely with Apple's proprietary VNC extensions.  You can get by with any VNC client, but the performance will be atrocious.  If you've found one, please leave a comment below, I'd love to know about it.

Updating UI from background threads, simple threading in Swift 3 for iOS

So, you’ve been working on your iOS app, and ran into some issue where the UI was stuttering. You googled it, and after a few minutes on stack overflow, your code is now downloading images for your table view on a background thread.  Now it scrolls buttery smooth.  You worked out the kink where the wrong image ua appearing in the cells, and you think you’re out of the woods.

You move on, but after a while you see some weirdness in your app... Suddenly all animations stop working.

There's a weird warning in the console: 

"This application is modifying the autolayout engine from a background thread, which can lead to engine corruption and weird crashes. This will cause an exception in a future release."

This sounds ominous, but luckily for you, the fix is easy.

Any code that changes the UI needs to execute in the main thread. 

Even if you’re not explicitly creating a separate thread, there are some functions that will implicitly run code in a closure in a background thread. 

I deal with this with a pair of really simple swift functions that I include in my utility file for all my projects.

UI() and BG() 

Update: I'd previously been using "qos: .background", but some code seemed to get hung up when doing that. I resolved my problem by changing the priority of the background blocks to "qos: .default", but feel free to experiment if you want.

func BG(_ block: @escaping ()->Void) {
    DispatchQueue.global(qos: .default).async(execute: block)
}

func UI(_ block: @escaping ()->Void) {
    DispatchQueue.main.async(execute: block)
}

The usage couldn’t be simpler. 

UI() { 
    // everything in here will execute on the main thread
} 

BG() { 
    // everything in here will execute in the background
} 

No need to remember the Grand Central Dispatch functions, and the slightly odd looking functions stick out in your code so you don’t overlook them. 

Update: Swift actually allows you to omit the parentheses , so you can actually just do this:

UI {
    // Everything in here will execute on the main thread
}

BG {
    // Everything in here will execute in the background
}


You need to be a little careful, if you run too much of your code in the UI block, you defeat the purpose of running your code in the background in the first place.

Also, you need to keep in mind that the code in both of these blocks won’t necessarily run in sequence with the surrounding code. It’s likely the line after your block will run before the code in the block executes.  Be careful! 

Eventually, you’ll need to do something fancier with threading, but these two functions account for 99% of my threading needs. Anyone looking at it will know the intent right away too.

Shopping at the wrong store, Frozen edition

Did some more shopping at my favorite knock off store... Not much to say other than enjoy!


This isn’t Frozen, I have no idea what you’re talking about

This isn’t Frozen, I have no idea what you’re talking about

The doll looks passable, anyway

The doll looks passable, anyway

It’s not Disney Frozen, it’s Diversity Fashion! 

It’s not Disney Frozen, it’s Diversity Fashion! 

Bold claims from Wonderful World Magic Snow... HAPPY EVERY DAY! 

Bold claims from Wonderful World Magic Snow... HAPPY EVERY DAY! 

Multi room (like Sonos) music on the cheap

Multi room audio is great.  A few years ago, if you hadn’t built your house with speaker wire to every room, you were pretty much out of luck. Running wire after the fact is a nightmare, and the old analog wireless speakers were universally terrible. 

Now days bluetooth has made wireless audio pretty common, but generally limited to playing from one device to one speaker or set of headphones. 

Sonos is a company that has made multi room audio easy to setup and great sounding, but it’s very expensive, and you’re locked into buying from them if you want to expand.

Apple actually has a pretty good solution to this that’s been available for years, but no one seems to know about it. 

It’s AirPlay.   

Every iOS device, the old AirPort routers   and Apple TV supports AirPlay, and apple has licensed the protocol to 3rd parties to implement in their hardware.

These work great out of the box, but they're pretty much limited to one speaker playing back at a time. The only application I’ve seen that will play to multiple speakers simultaneously is iTunes.  

Enter Rogue Amoeba with an app called AirFoil. This $20 program runs on your mac or PC and manages all the air play devices on your network. It allows your mac to play to any combination of speakers and set their volume independently. It even has an EQ if you want more bass or treble in your sound. I don't have any relationship with Rogue Amoeba (I still have to spell check it every time I write it), I'm just a happy customer.


The Mac app to control your speakers

The Mac app to control your speakers

Even better, there is an iOS app that lets you control airfoil from your iPhone. Now, wherever you are in the house, you can control the music and volume.  If you want to turn the music on or off on certain rooms, you can do that too. The protocol keeps everything perfectly in sync. You'd be surprised how distracting a slight delay between different speakers can be. 

The iOS app to control your speakers

The iOS app to control your speakers

Aside from just buying AirPlay compatible speakers, any speaker that supports Chrome Cast can be added to your network of speakers. If you have an old iPod dock and an old iPhone, there's an airfoil app that can turn that into a remote speaker too. They have a legacy app that works on phones at least as old as an iPhone 3G. Finally an excuse to dig them out of the drawer they've been collecting dust in. 

I recently added a new room by plugging an old console stereo into an AirPort Express I got used for $20.  The stereo only had a record player and barely functional radio before, now it sounds great.

August Door Lock review, 2 years later

I've now had the August door lock and August Connect for 2 years.  Here are my impressions.

Update: thanks for the feedback reddit, I added a couple screen shots of the August app to clear a couple things up.

I haven’t been too drawn to many of the internet of things devices I’ve seen.  Most of them seem like more work than the non-connected devices that they replace. 

However, the way our house is laid out, we need to unlock our front door, even when coming in from the garage.

When these Bluetooth and wifi door locks first came on the market, there were quite a few options.  The August one stood out for two related reasons, it actually looked quite nice. Other locks were plasticity or had lots of flashing LEDs. Neither of which really worked with our house's esthetic.  We didn’t have to replace the outside lock. This was important again because we have a nice looking front door and the other locks just wouldn’t fit in. 

The installation was a breeze... If you can operate a screwdriver to replace batteries in a toy, you can handle this.

Software is pretty easy to setup too.

So, how was it? Pretty good. But it wasn’t 100% reliable.  More like 90%, which can be really frustrating. When something usually works, it’s all the more frustrating when it doesn’t.  That's not the end of the story though, read on!

One nice thing about software controlled devices is that they don’t necessarily stay the way they are out of the box. August has been really good about updating the lock. Things that didn’t quite work right that I had thought I’d just have to accept as a price for the convenience of having a magical door that unlocked itself were eventually resolved.  The August connect accessory that seemed to need to be restarted once a week to work reliably now seems to never need to be reset. 

After two years, the lock works the way I envisioned, 99.9% of the time, it works.  We don’t even think about it anymore. I don’t carry a house key.  I just expect by the time I get to the front door that it will be unlocked, and... It is.  Always. it’s quick to lock the door from the notification center, and if we forget when leaving the house, we can do it from anywhere using the connect accessory.

The lock installed, looks nice! &nbsp;You need exactly 1 tool to install it, a screwdriver.

The lock installed, looks nice!  You need exactly 1 tool to install it, a screwdriver.

Here's the connect accessory, it is a wifi bridge that lets you see the status of your lock and lock it and unlock it from anywhere.&nbsp;

Here's the connect accessory, it is a wifi bridge that lets you see the status of your lock and lock it and unlock it from anywhere. 

The battery life seems to have improved as well. Part of that may have been tweaking the physical installation so that the deadbolt moved more smoothly, but listening to the unit operate, I suspect August has tweaked the way the motor operates as well.

I should also note that it gets really cold here... like -40 cold, and the lock although it gets ice cold to the touch (as do all locks), never skips a beat.

My only two hardware complaints are:

  1. it seems thicker than it should be... honestly, I've pretty much gotten used to it, so it's not that big of a deal now, but I could have sworn it looked thinner in earlier pre-production shots.
  2. the battery cover comes off a little to easily.  Again, we're used to the way it works now.  You turn the outside sleeve to lock/unlock the door, and we grab it there now.  Guests who are unfamiliar with the lock usually grab the whole thing and start turning, popping the battery cover off in the process.

There is an updated version of the lock, that is also HomeKit enabled.  Since I don't have any other home kit devices, this doesn't really seem like a big deal to me. If my August died now, I'd probably replace it with one of those, but this one is working flawlessly.

August has also created a keypad accessory to let you unlock the door with a combination.  I don't know that I really want this now, perhaps when my kids are old enough to be coming and going on their own... although, by then, they'll probably have hand-me-down iPhones and won't need it.

Overall, I'd still strongly recommend the lock.  I'd get the bridge as well.  The peace of mind of knowing the door is really locked is worth it for me, and the couple times I've let people in with it have saved a lot of trouble.  If you are interested, you can purchase through one of the Amazon affiliate links below, and give me a small referral fee (at no cost to you).

Here are a couple screen shots of the app: 

the main screen... Big red button for currently locked, it’s green if currently unlocked

the main screen... Big red button for currently locked, it’s green if currently unlocked

You can set the lock to auto lock after a certain amount of time, in case you forget

You can set the lock to auto lock after a certain amount of time, in case you forget

Mac shortcut to see what channel everyone else is on

I just posted another article on adjusting your WiFi network's channel to avoid microwave interference.

Another source of interference is everybody else's WiFi networks.

If your network problems don't seem to be caused by microwave interference, you might be getting interference from neighbour's networks.  How do you tell?

The same trick we used in the other post.

Hold down alt / option when clicking the wifi strength indicator.  As discussed before, this will show advanced details including the channel your network is operating on.

But... if you hover over any of the other networks listed, you'll also see what channel they are on and their signal strength, even if you don't know the network key and can't use them.

In the example screenshot, you can see the Harry Potter 2 network is on channel 6.  By checking the other (especially strong) networks in your list, you can see the least popular channel, and set your network to that.

Picking a non-crowded channel is a great way to improve the performance of your network.

WiFi and microwaves

Everyone has a wifi network in their house these days, but for most it’s a black box. 

Most wifi access points and routers have literally hundreds of settings that can be tweaked.  

Most of it is inscrutable, even to it professionals. There are a few that are really important though, and don’t require a degree to understand. 

Wifi can operate in two main frequency bands, 2.4 and 5GHz. Most routers use 2.4, as it offers better range, at the expense of less available bandwidth. 

The reason that these bands are available for wifi is because they are unlicensed. Anyone can create a device that operates in this band without asking anyone, as long as they follow some rules about maximum power and so forth. The problem with this, is there are millions of devices competing to use this spectrum. 

In a typical western home, even if you don’t own any other wireless devices, you probably own a microwave. Microwaves heat food with radiation in the same 2.4GHz band. You may have noticed that your WiFi completely stops working or gets erratic when using a microwave.  This is often a problem in office buildings and apartments.

Often when it comes to situations of interference like this, you don't have much chance to fix it.  In this case, there's an easy fix.  Microwave ovens tend to use the higher end of the 2.4GHz band.  Routers will usually let you pick the channel they operate on.  The channel ranges from 1 - 11 in North America.  If microwaves are causing you problems, use channel 1.  Problem solved!  I can't use my wifi at all with the microwave on when on channel 11, but on channel 1, it's rock solid.  I've tested this in many places and with many different microwaves, and this almost always works.

How you set your router's channel depends on your router.  Assuming you know how to get to your router's configuration page, it usually looks something like this:

You can easily check what channel your router is currently on with a Mac.  Hold down the option / alt key and click on the wireless indicator.  You'll see a screen like this.  In my case, I'm on channel 6, and susceptible to microwave interference!

Tags , ,

Quick and dirty script to make Icons for macOS

Sometimes you just need a quick icon for your app.  You don't need anything fancy.  You cobble together something quick, then realize you need to save 10 copies of if and remember the syntax to create a .icns file, or drag each one into Xcode separately.  Or maybe find one of those online services that do it for free but sign you up their mailing list.

If none of that appeals to you, here is a quick (and extremely dirty) bash script that will do it for you in a second or two.  It's dead-simple, no fancy tricks and you should have the requirements pre-installed if you have a Mac and Xcode.  

Drop the code in a .sh file and chmod a+x it... it takes one parameter, the path to a .png file.  It should be at least 1536x1536 and should be square.  No error-checking of any kind is performed.

It uses the following 3 utilities that you probably have installed: 

  • sed for a quick regex
  • sips to do the image resizing
  • iconutil to make the .icns file

I'm sure you can improve on it, but I spent more time writing this post about it than I did writing the script, and it suits me just fine!

Hope it saves you some googling and time on stack overflow ; )


#!/bin/bash
infile=$(echo "$1" | sed -E 's/\.png//g')
echo "Making icons for $infile"

mkdir icon.iconset

sips $1 -Z 1024 --out icon.iconset/icon_512x512@2x.png
sips $1 -Z 512 --out icon.iconset/icon_512x512.png
sips $1 -Z 512 --out icon.iconset/icon_256x256@2x.png
sips $1 -Z 256 --out icon.iconset/icon_256x256.png
sips $1 -Z 256 --out icon.iconset/icon_128x128@2x.png
sips $1 -Z 128 --out icon.iconset/icon_128x128.png
sips $1 -Z 64 --out icon.iconset/icon_32x32@2x.png
sips $1 -Z 32 --out icon.iconset/icon_32x32.png
sips $1 -Z 32 --out icon.iconset/icon_16x16@2x.png
sips $1 -Z 16 --out icon.iconset/icon_16x16.png

sips $1 -Z 512 --out iTunesArtwork@1x.png
sips $1 -Z 1024 --out iTunesArtwork@2x.png
sips $1 -Z 1536 --out iTunesArtwork@3x.png

iconutil -c icns icon.iconset

Tags ,

Randomizing slide show order in macOS Photos.app

Update March 22, 2017: The slideshow randomizer discussed below is now complete!

Thank you to everyone who helped test it!

 Click here to get it.  The test version mentioned below is no longer available.


Original post follows:

The Yosemite version of macOS added the new Photos.app to replace iPhoto.  I think it’s better in most ways, but has one limitation that seems crazy to me. 

You can not display a slide show in random order!  The closest you can do is you use the screen saver as a slide show, but it a) doesn’t include your video clips, and b) for some reason always starts repeating after about 50 pictures or so.

I’ve looked for alternatives, but can’t really find anything that will just play a nice slide show with videos.

That’s the bad news, the good news is: 

I’ve come up with a solution.  I’m looking for testers of a macOS app that will give you a list of your Photos slide shows, and let you randomize the order. 

Send a note to electrollama@gmail.com to get a test version. 

Tags ,

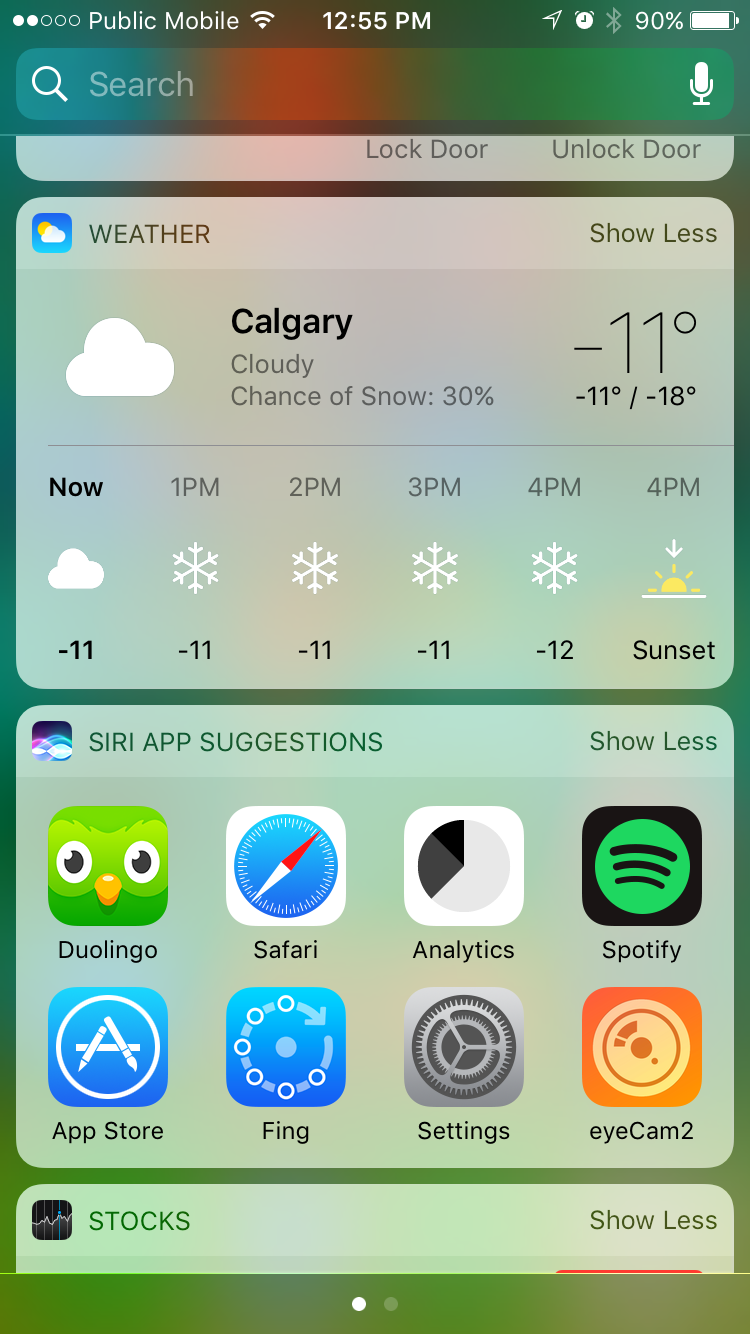
iOS Bug in Weather Widget

I was surprised to see such an obvious bug in the built in weather app in iOS. If the temperature is below 0 degrees C (which is pretty normal here for half the year), the forecast doesn’t show the minus sign. 

These iOS engineers need to get out of California and deal with some cold weather! 

These iOS engineers need to get out of California and deal with some cold weather!